
Your character looks perfect in the first AI-generated clip. Then you make Scene 2—and the face changes, the jacket disappears, or the hairstyle looks completely different. If you are creating an AI short film or Instagram Reel, that breaks the illusion immediately.
The fix is not to repeat “same face” ten times. In Google Flow, a better approach is to give the model a stable visual reference and reuse it deliberately across shots.
In this guide, you will learn three documented ways to do that: the Characters library, Ingredients (reference images), and Frames (start and end images). You will also get three copy-ready scene prompts, a budget-conscious workflow, and a checklist for comparing the results. See Google’s character-management guide and video creation help for the underlying controls.
Quick Answer: How Do You Keep a Character Consistent in Google Flow?
Create or choose one recognizable reference character and reuse that same asset in every scene. If your Flow project includes the Characters library, create a reusable character with one or two reference images, give it a name, and mention it in each prompt using @CharacterName. You can also attach the same image as an Ingredient, or use start/end Frames to control visual continuity between adjacent shots.
Google documents dedicated Characters, Ingredients and Frames, and model-specific feature support. These tools are intended to improve consistency, but AI generation can still change details; always inspect the outputs.
| Method | What stays anchored | When to use it |
|---|---|---|
| Characters | A reusable character profile, including visual references and a selected voice | Recurring protagonist across separate shots |
| Ingredients / References | An attached source image for a character, object or style | When you already have a strong character picture or cannot access Characters |
| Start & end Frames | The images used at clip boundaries | For a deliberate transition or continuity between connected shots |
Before You Start: Account Access, Model Support and Credits
1. Check availability in your account
Start at Google Flow on a desktop Chromium-based browser if possible. Flow is available in India and many other regions to eligible users aged 18 or older. Google’s getting-started page currently emphasizes supported paid subscriptions, while its credits page describes 50 daily credits for non-subscribers. Because these pages do not describe account access in exactly the same way, sign in and check your own workspace before assuming free video generation or the Characters feature is available.
Without a subscription, Google also warns that video generation may be unavailable during roughly 2–5 p.m. UTC peak hours. Some features depend on plan, region and chosen model.
2. Choose a model that supports reference images
For this exercise, choose a model that supports Ingredients/References to Video. Google’s model support matrix currently lists this for Veo 3.1 Lite and Fast (8-second clips) and Gemini Omni Flash (multiple lengths). Veo 3.1 Quality does not currently support Ingredients/References to Video, according to that matrix. If your selected model rejects an ingredient, switch to a supported model before rewriting the prompt.
For tight continuity between two shots, the same support matrix also lists start/end Frames for several models. Read the model options shown in your account rather than relying on a tutorial screenshot from an older interface.
3. Budget before you generate
Google’s credit documentation currently lists 10 credits per Veo 3.1 Lite generation for non-Ultra users, while other models, durations and editing operations have different costs. That means three qualifying single-output Lite generations would cost 30 credits, *if* the feature and model are available to your account, with no retries or extra charged outputs. This is an illustrative calculation, not a guarantee of three finished clips for 30 credits.
Step 1: Build a Character Reference That Is Easy to Reuse
We will use one fictional adult character for this tutorial. A fictional subject avoids privacy and identity-consent problems, and the distinctive visual details make it easier to spot changes.
| Character detail | Reference specification |
|---|---|
| Name | Maya (fictional character) |
| Appearance | Adult South Asian woman; shoulder-length wavy black hair; warm medium-brown skin; oval face |
| Recognizable details | Round tortoiseshell glasses; small silver hoop earrings |
| Outfit | Mustard-yellow jacket over a plain white top; dark blue jeans |
| Visual style | Natural cinematic realism; soft daylight; no stylized or cartoon features |
| Reference images | Clean front-facing portrait; optional three-quarter view of the same person |
Generate or upload an image with a plain background and clear facial detail. Google recommends clean references with minimal background clutter; otherwise, the model can mix unrelated subjects or objects into the scene.
A consistent reference portrait of Maya, a fictional adult South Asian woman with shoulder-length wavy black hair, warm medium-brown skin, an oval face, round tortoiseshell glasses and small silver hoop earrings. She wears a mustard-yellow jacket over a plain white shirt and dark blue jeans. Natural cinematic photography, soft daylight, neutral uncluttered background, clearly visible face and clothing, no text or logos.If you generate a second view, preserve the person and clothing exactly. Change only the angle. Save your best image and use it as the reference for all three scenes; do not create a fresh unrelated portrait for each shot.
Step 2: Save Maya as a Reusable Character (If Available)


- Open a project in Google Flow and select Characters in the left sidebar.
- Choose New Character when the option appears.
- Describe Maya using the reference specification above.
- Upload or generate one or two images showing the same appearance; Google says a character needs at least one image.
- Generate the character image, give the character the name Maya, and select a voice if the interface requests one.
- Save the character. In a later video prompt, type
@Mayaand select the matching character reference if Flow offers autocomplete.
This follows Google’s character creation instructions. Its Characters system is designed to package visual and voice references so users do not have to upload the same images for every clip. Still, review face shape, glasses, hairstyle, clothing and voice after every generation; “consistent” should not be interpreted as a zero-error guarantee.
If the Characters menu is missing: Skip to the next method. Upload Maya’s portrait as an Ingredient/Reference in each scene instead. You can still work toward consistency without a dedicated saved character.
Step 3: Use the Same Ingredient Image in Every Scene

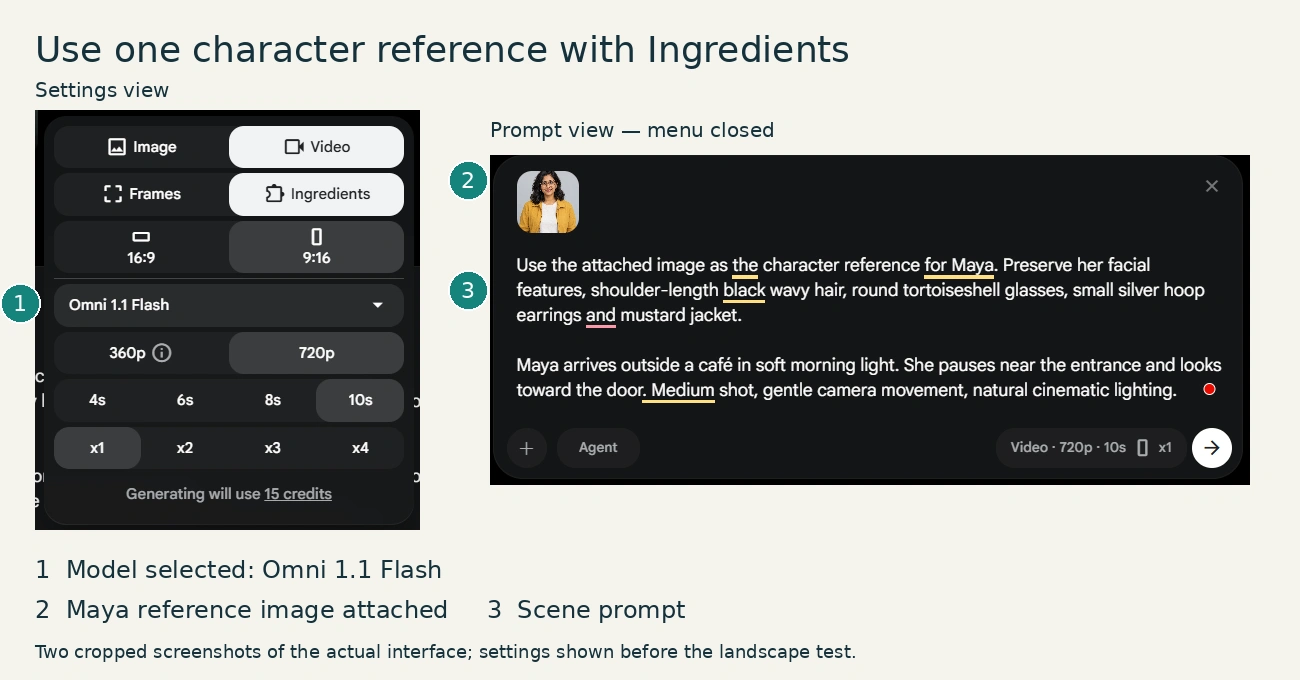
- In the Flow project prompt box, select a video model that supports Ingredients.
- Choose Video → Ingredients (the exact layout may vary) and attach Maya’s original portrait.
- Describe the reference explicitly: “Use the attached image as the identity and outfit reference for Maya.”
- Keep the same reference asset in Scenes 1, 2 and 3.
- Change the location, action and camera direction between scenes—not her defining physical traits.
- Review each clip before moving on. If the face has changed, correct the input or simplify the action rather than spending credits on many random rewrites.
Google’s video generation documentation explicitly supports attaching image references and selecting saved project assets. The same document recommends clean ingredient backgrounds, consistent visual style and prompts that do not contradict the reference images.
Step 4: Copy These Three Google Flow Character-Consistency Prompts
Our example is a short “day in the life” montage. Generate each scene as a separate clip with the same Maya reference or @Maya character selected. Keep the aspect ratio at 9:16 for a vertical Reel or Short, if your chosen model offers it.
Scene 1 — Arriving at the café
REFERENCE: Use @Maya or the attached Maya character image as the identity and wardrobe reference. Preserve her recognizable face, round tortoiseshell glasses, wavy shoulder-length black hair, small silver hoops, mustard-yellow jacket, white top and dark jeans. SCENE: Maya walks toward a cozy modern café entrance on a sunny morning, looks at the sign and smiles. Medium shot, slow side-tracking camera, natural daylight, realistic cinematic look, smooth walking motion. Vertical 9:16. No dialogue, no on-screen text, no logos.Check before continuing: Is her face recognizable? Are the glasses, jacket, hair and earrings all visible? Save a clear frame from this clip for comparison.
Scene 2 — Working by the window
REFERENCE: Use the same @Maya character or exactly the same original reference image from Scene 1. Keep the face, hairstyle, round tortoiseshell glasses, small silver hoops and mustard-yellow jacket unchanged. SCENE: Inside the same café, Maya sits by a large window, opens a notebook beside a laptop and turns one page. Three-quarter medium shot, gentle camera push-in, soft window light, realistic cinematic look. Vertical 9:16. One person only. No dialogue, no on-screen text or logos.Check: Compare Maya’s face and outfit with Scene 1 rather than comparing only the overall mood. The indoor lighting can be different, but her identifying details should remain stable.
Scene 3 — Leaving at sunset
REFERENCE: Use the same @Maya character or the identical Maya reference image from Scenes 1 and 2. Preserve her facial features, round tortoiseshell glasses, shoulder-length wavy black hair, small silver hoops, mustard-yellow jacket, white top and dark jeans. SCENE: Maya steps outside the café onto the sidewalk at golden hour, briefly looks back over her shoulder and walks away. Medium shot with a slow follow-camera move, warm sunset light, smooth natural motion and realistic cinematic photography. Vertical 9:16. No costume changes, no other foreground people, no dialogue, text or logos.Check: The final lighting is warmer, which can make skin or clothing colors appear different. Judge structural identity and the jacket’s actual design, not just the warmth of the color grade.
Step 5: Compare Results Before You Combine the Clips

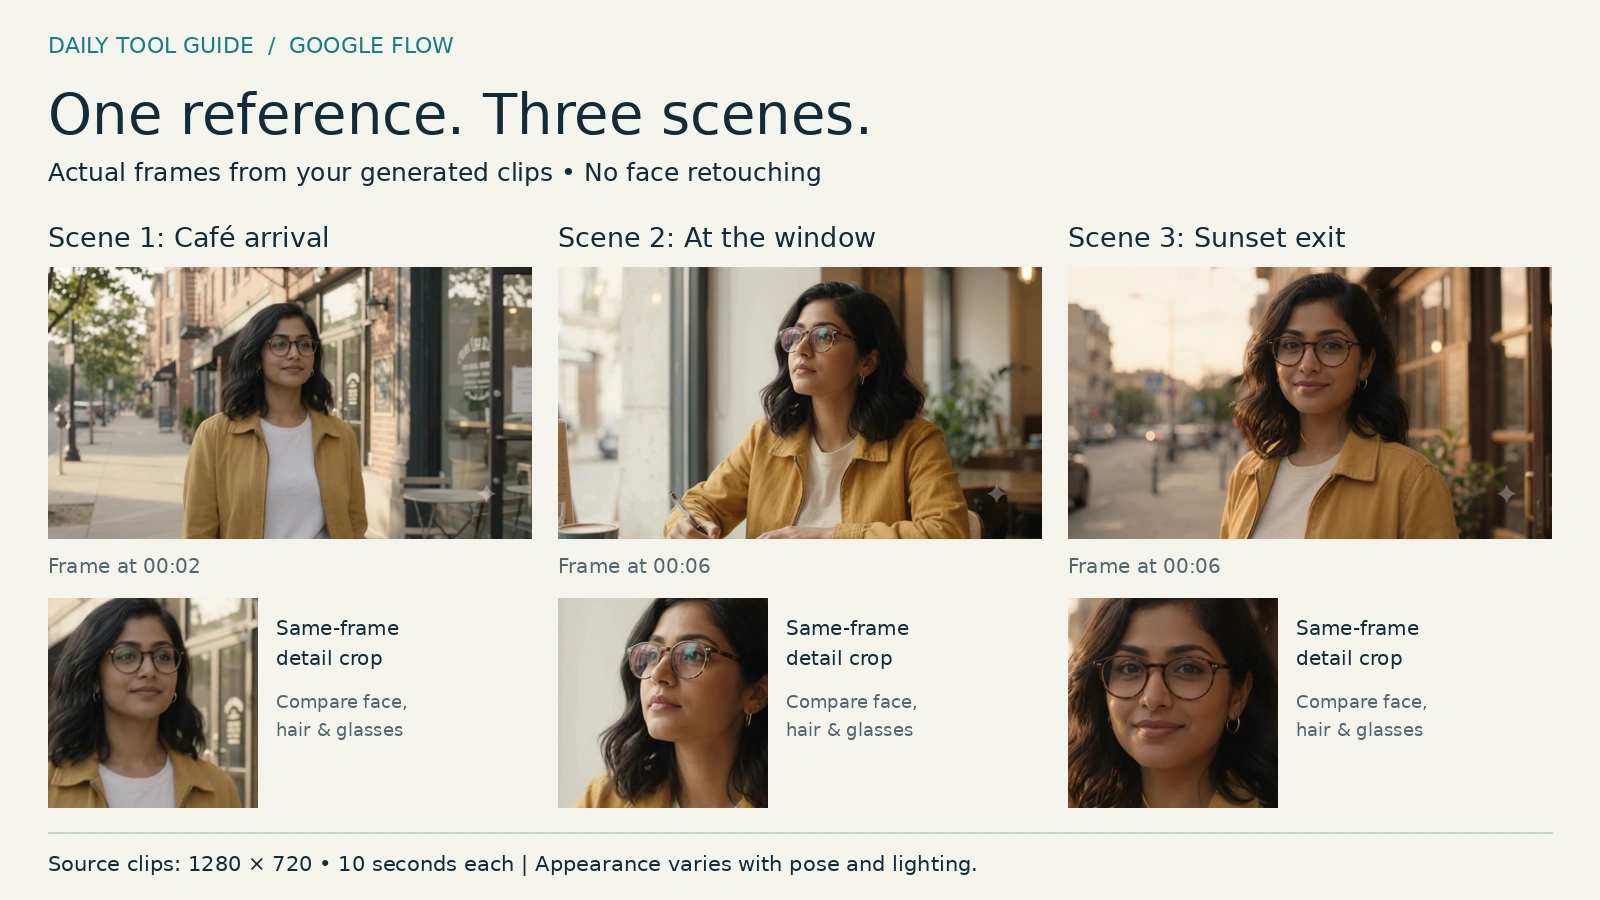
Creating three videos with the same character reference is only part of the process. The next step is checking whether the character actually looks consistent across all three scenes.
For our Daily Tool Guide demonstration, we generated three separate Google Flow video clips featuring Maya, our fictional AI character:
- Scene 1 — Arriving at the café: Maya approaches the café entrance in morning light.
- Scene 2 — Writing in her notebook: Maya sits inside the café and writes in her notebook.
- Scene 3 — Stepping outside: Maya exits the café in a different lighting environment.
We selected frames from the generated videos and arranged them side by side to examine how Maya’s appearance carries across different settings, camera angles, and lighting conditions. The comparison image below shows frames taken from our Google Flow video outputs, not separately generated character illustrations.
What Should You Check for Character Consistency?
When comparing AI-generated scenes, don’t judge consistency only by the overall cinematic style. Pay attention to the small visual details that make a character recognizable.
| What to inspect | What should remain consistent | Common AI generation problems |
|---|---|---|
| Facial features | Recognizable face shape, eyes, nose, and overall facial proportions | The character looks like a different person |
| Hairstyle | Similar hair length, texture, and parting | Hair becomes shorter, straighter, or changes style |
| Glasses and accessories | Same round glasses and small silver earrings | Glasses disappear or accessories change |
| Clothing | Mustard-yellow jacket, white top, and matching outfit details | Different jacket, colors, or clothing design |
| Movement | Natural walking, sitting, and hand movements | Distorted fingers, unnatural motion, or visual glitches |
| Scene continuity | The character remains recognizable across locations | Face, proportions, or clothing change between clips |
What Did Our Three-Scene Demonstration Show?
Our experiment provides a practical way to examine character consistency across separately generated AI video scenes.
The café setting allows us to compare Maya in different lighting conditions, including outdoor daylight and indoor window light.
These differences matter because changes in lighting, camera position, and movement can affect how a character appears, even when the same visual reference is used.
Our side-by-side comparison helps readers inspect recognizable details such as facial structure, glasses, hairstyle, and clothing. It is a qualitative visual demonstration, not a controlled benchmark or a claim of perfect character consistency.
Important: Google Flow’s character and reference features can improve continuity, but they do not guarantee that every facial detail, accessory, or movement will remain identical in every generated frame.
How to Evaluate Your Own Google Flow Videos
After generating your scenes:
- Open all three generated clips.
- Pause each video at a moment when the character’s face is clearly visible.
- Save one representative frame from each clip.
- Arrange the frames side by side.
- Compare facial features, hairstyle, accessories, clothing, and body proportions.
- Mark each category as Pass, Needs Fixing, or Not Visible.
- If a scene has noticeable identity changes, revisit its reference image, prompt, or generation settings before spending credits on another attempt.
For our demonstration, the comparison uses landscape video outputs. The earlier prompts in this tutorial recommend 9:16 vertical framing for Reels and YouTube Shorts when supported; that is a recommended adaptation rather than the format used for our published comparison.
Practical tip: Save your original reference image, prompts, model details, and generated videos. These records make it easier to understand which settings produced the most consistent results and help you recreate the workflow later.
When Should You Use Start and End Frames Instead?

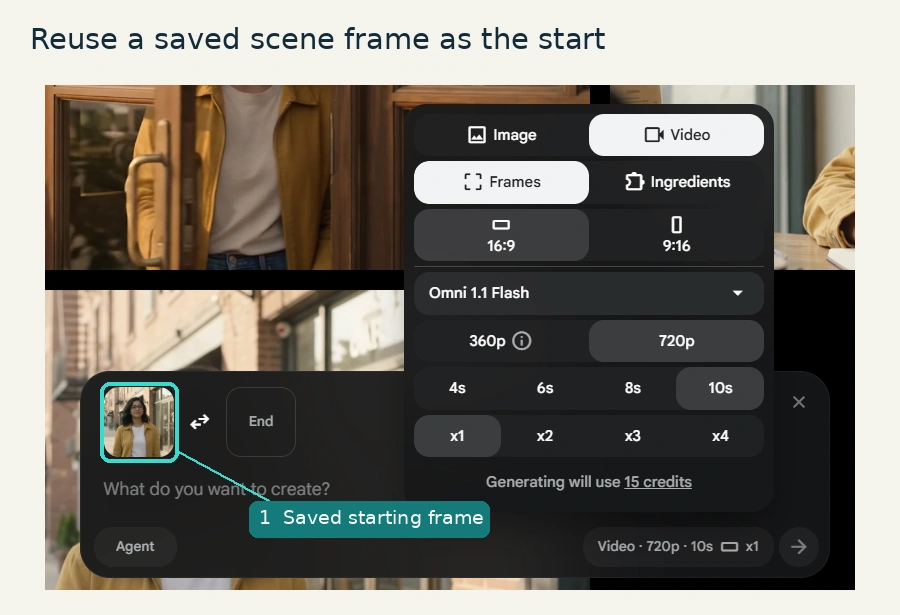
Characters and Ingredients anchor a person’s *appearance*. Frames are more useful when you want the end of one shot to connect logically to the beginning of the next.
For example, capture a clear frame from the end of Scene 1 with Maya standing at the café entrance. Then use that same image as the start frame for the next shot, if your model supports it. You are giving Flow a specific visual starting point, not merely describing a person in text.
- Pause the first generated clip on a clear, useful frame.
- Save that frame to your Flow project using the available Save frame control.
- Start a new generation and choose Video → Frames in a supported model.
- Attach the saved frame as the start frame. Add an optional end frame only when it helps the intended transition.
- Describe the action between frames and generate. Compare the face and clothing after the transition.
Google documents both Frames to Video and saving frames from generated clips. A start or end frame gives stronger composition control but still does not guarantee identical visual details through complex motion.
Character Consistency Mistakes That Waste Credits
- Rewriting the character from scratch in each prompt: Reuse the exact same visual asset, not just a similar description.
- Switching to an incompatible video model: Check the model-support matrix before using Ingredients or Frames.
- Changing hairstyle or clothing in the story: If wardrobe continuity matters, do not casually ask for “a different stylish outfit.”
- Uploading crowded reference photos: Multiple people and busy backgrounds make the intended subject harder to isolate.
- Making the action too complex too early: Begin with a medium shot and one simple movement before attempting fast spins or multiple characters.
- Ignoring lens and lighting changes: A different camera angle can make a consistent face appear different; compare several clear frames.
- Burning credits on repeated outputs without notes: Record the prompt, reference and model each time so you know what actually changed.
Is Google Flow Character Consistency Free?
Not necessarily for every user or feature. Google’s current credit guidance says accounts without a subscription receive 50 daily Flow credits to try the service, but its getting-started page describes subscription eligibility more narrowly. Access to particular models or Characters may still differ by account, country, rollout and plan. Check what is available when you sign in rather than buying a plan solely because another tutorial says a feature is free.
Even with credits, three successful shots are not the same as three finished scenes: you may need to regenerate mistakes and do additional editing. If you are exploring free options more broadly, see our Best Free AI Video Generators in 2026 guide.
How to Turn the Three Scenes into a Reel or Short
Once the shots pass your continuity checklist, place them in sequence. Google Flow’s Scenebuilder can arrange and trim multiple clips; you can also use a conventional editor for narration, captions, music and pacing.
- Use a short opening hook such as “Can one AI character survive three different scenes?”
- Place the three clips in chronological order: arrival → working → leaving.
- Trim any awkward starts or ending frames.
- Add captions outside the face and key action areas, especially for vertical video.
- Watch the full edit on a phone and confirm the character still looks consistent during cuts.
- Label AI-generated footage when the publishing platform or context requires disclosure, and check any music and image rights.
If your goal is building a complete channel around short AI videos, our faceless YouTube channel guide covers the larger production workflow. For editable animated charts and text rather than lifelike scenes, Claude Motion is a different type of tool.
Can You Use a Real Person’s Face as a Flow Character?
Only use images you own or have permission to use. A reference photo is not a license to imitate someone’s identity or publish a misleading portrayal. Be particularly cautious with recognizable individuals, minors, voice imitation, and deceptive synthetic video. Follow Flow’s policies and the platform’s disclosure requirements before sharing.
Google states that its video-generation ecosystem uses SynthID watermarking. Watermark presence or absence is not by itself a complete authenticity test. See our Google SynthID Detector explainer for the separate detection topic.
Frequently Asked Questions
How do I keep the same face in Google Flow?
Reuse the same saved Character or the same original image as an Ingredient in each shot. Check that your selected model supports references. Compare clear output frames and regenerate only if important features drift.
What is the difference between Characters and Ingredients?
Characters are reusable profiles intended for a recurring person, with visual references and a selected voice. Ingredients are image or media references you attach to guide a particular generation. If the Characters library is unavailable, using the same Ingredient image is a practical alternative.
Can I keep the same clothes in every Google Flow scene?
You can improve the odds by using a clear full-outfit reference and keeping wardrobe instructions identical. The result still needs review: small accessories and fabric details may change.
Does using a reference image guarantee perfect consistency?
No. Reference images and saved characters are tools for better continuity, not guarantees that every shot will preserve every detail through every movement and lighting change.
Does Google Flow support vertical video?
Yes. Google’s model feature matrix lists portrait and landscape support for multiple video models and generation modes. Check the aspect ratio shown in your own account before generating.
How many credits do I need for three scenes?
The total depends on the model, duration, number of outputs and retries. As one example, if a supported Veo 3.1 Lite generation costs 10 credits and you make exactly three charged generations, that is 30 credits. Your actual project can cost more.
Can I use a character voice across multiple scenes?
Google’s Characters documentation describes reusable voice settings. Its voice reference help also explains separate voice references for supported ingredient-based generations. Check the model and region restrictions before relying on this.
Final Takeaway
For character continuity, your most valuable asset is usually one good reference—not a longer prompt. Start with a clear fictional character image, save it as a reusable Character if your account supports that feature, attach it as an Ingredient when needed, and use start/end Frames for shots that must transition smoothly.
Generate simple shots first, change one part of the scene at a time, and judge the actual frames before spending more credits. That is a more reliable workflow than generating three unrelated clips and hoping the AI creates the same person every time.
Official Sources and Editorial Method
This guide combines Google’s official Flow documentation with an original three-scene video demonstration featuring the fictional character Maya. The example prompts explain how readers can reproduce a similar workflow, while the comparison image shows frames from generated clips. Our visual evaluation is qualitative, not a controlled model benchmark. Feature availability, credits, and output quality can vary by account, model, and settings.
- Google Flow — Create and manage Characters
- Google Flow — Create videos, Ingredients and Frames
- Google Flow — Supported models and features
- Google Flow — Credits and per-generation costs
- Google Flow — Getting started and access restrictions
- Google Flow — Supported countries and languages
- Google Flow — Edit videos, save frames and build scenes
- Google — Improvements to Veo Ingredients to Video


